
Web Design :: Lessons :: Links in Dreamweaver
Adding Links
The <a> tag defines a hyperlink, which is used to link from one page to another.
The most important attribute of the <a> element is the href attribute, which indicates the link's destination.
Adding links in Dreamweaver is not very difficult. The first thing you have to do is select the item that will be the link. If you are making a text link highlight all of the text that will make up the link. If you are making an image link simply click on the image. Once you have your future link selected there are a few ways to turn it into a link.
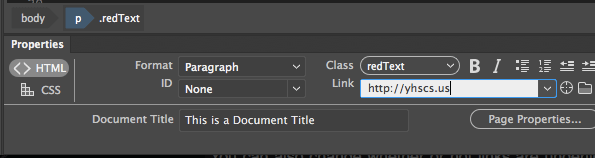
- External Links: If you are linking to another place on the internet (ie anything that is not on your website) then there is only one way to create a link without using HTML. When your future link is selected go to the Properties Pane at the bottom of the Dreamweaver workspace and type the link in the Link section. IMPORTANT: All links must start with http:// or https:// depending on what you are linking to. If you start with www without the http:// the link will not work.
- Internal Links: If you are creating an internal link (ie a link to a page on your web site) you can simply type the path to the file in the Link section of the Properties Pane. If the file is in the same folder as the page you are working on you can simply type the name of the file. If the file isn't in the same folder you need to type the path such as images/dlee.png.
- Browse for File: If the file you are linking to isn't in the same folder as the current page then you may want to use a different method to link to it. One way is to browse for the file. You can do this by clicking on the folder icon next to the Link section of the Properties Pane and then browse for the file you want to link to.
It is very important to test the links in your page after creating them to make sure they work correctly. You can go to Site>Check Links Sitewide to have Dreamweaver check your links for you.
Link States
Link States from W3 Schools:Links can be styled with any CSS property (e.g. color, font-family, background, etc.).
Special for links are that they can be styled differently depending on what state they are in.
Although you may not realize it yet, links have a number of different states. These states occur at different points of interaction with the link, and you can use the knowledge of different states to easily create some cool link effects. There are four link states we are going to cover:
- link: The normal state of a link before the visitor has interacted with it.
- visited: The state of a link after the user has already visited the page that it links to.
- hover: The state of a link when the user hovers the mouse cursor over it.
- active: The state of a link when the user clicks it.
You can change all of these link states to different colors, but generally the link and visited states are the same color and the hover and active states are the same color. Feel free to play around with different combinations of color, though, to find something you like.
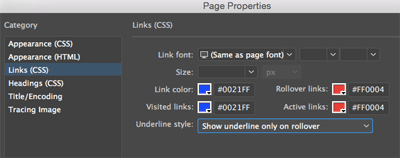
- Go to the Properties Pane.
- Click on the Page Properties button.
- Go to the Links (CSS) section.
- Change the link state colors and/or underline properties.
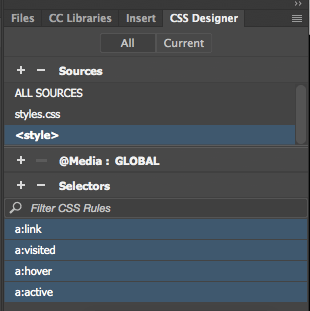
Once you've changed the link states, they will be saved as styles on the page. However, you probably want the states to be in your CSS file so you can have the same states on all of your website pages. Follow the steps below to move the link states to your stylesheet.
- Go to the CSS Designer tab.
- Under "Sources," click on the <style> tag.
- Highlight all of the "a" selectors.
- Drag the "a" selectors to your CSS file under "Sources."


