
Web Design :: Lessons :: Introduction to Dreamweaver
The Dreamweaver Environment
 Adobe Dreamweaver was originally created by Macromedia in 1997, and is now developed by Adobe after they purchased Macromedia in 2005. Macromedia was formed by the merger of three smaller companies: Macromind, Paracomp, and Authorware. The program is a WYSIWYG website editor, which stands for What You See Is What You Get. That means that even though Dreamweaver creates web pages based on HTML code, you do not have to interact with the code to create a web page. We will learn a little about HTML in this course, but for the most part we will use the WYSIWYG features of the program.
Macromedia experienced such success with the first version of Dreamweaver, which was only released for the Macintosh, that they released an entire web suite the following year for the Mac and PC that included Flash for creating web animations and Fireworks for creating graphics for the web. The version this class will be using, Dreamweaver CC 2017, is the 18th major release of Dreamweaver, and the tenth released under Adobe.
- Start Dreamweaver.
- Go to File>New.
- Give your new document a title such as "Dreamweaver Lesson."
- Hit the Create button to make a new HTML page.
- Save the page as "index.html."
When you create a new page you should always give it a document title, which shows up in the title bar or tab of the web browser. If you don't do this, your page will have a document title of "Untitled Document."
You should see a screen that looks similar to the one below. It may look slightly different since some windows my be hidden or tabs may be minimized. Dreamweaver's environment is totally customizable so you can reorganize it however you would like.

Code view will only show you the HTML code of your page. Split view shows the HTML code as well as an editable view of the page so you do not always have to edit the code directly. Design view lets you see what the page looks like and edit the page, while Live view will give you a better idea of what the page looks like without as many editing capabilities as Design view.
Adding Text
Adding text is one of the most basic tasks in Dreamweaver, but it imvolves a few steps. Simply type whatever text you want into Design view. Pressing "Enter" while typing will creating a new paragraph, which includes a blank line in between lines, while pressing "Shift-Enter" will insert a line break, which does not insert a blank line or create a new paragraph.
- Type some text into Dreamweaver.
- Include more than one paragraph and at least one line break.
The <h1> to <h6> tags are used to define HTML headings.
<h1> defines the most important heading. <h6> defines the least important heading.
You can change the text into a format other than a paragraph, however. Mainly this means you can use different headings to format your text. Headings are intended to make your text stand out from normal paragraphs so they are ideal for titles and subtitles. The largest heading is <h1> while the smallest is <h6>. You should always have a title at the top of your page using a header or an image. This title at the top of the page is known as the page title, and it is important to have one to describe the content of your page. The page title should always be a <h1> heading and it should be the only <h1> heading on the page.
- Add a page title to your lesson page.

Element Styles
 So far we have only added content to the page. The only thing we have done that changed how the page looked was adding text and using different headings. Styles in web design are meant to change how things on a page look, or the presentation of a page.
Let's try to change the look of our page title. We will do this by creating an element style, which changes the look of all elements of that type.
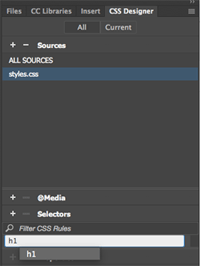
- Go to the CSS Designer tab.
- Hit the "+" next to Sources and "Create a New CSS File."
- Call your new CSS file "styles.css."
- Hit the "+" next to Selectors.
- Call your new selector "h1".
At this point you have create an element style that will affect all <h1> tags on the page. There is only one <h1> tag on the page, but if there were multiple tags this style would apply to all of them.
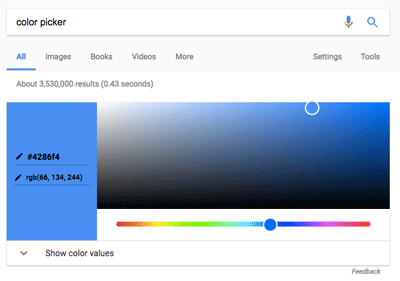
- Go to Google and search "Color Picker."
- Find a color you want to use for your page title.
- Copy the hexadecimal code for your color, including the #.
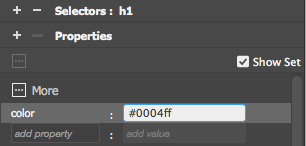
- In Dreamweaver, hit the "+" next to Properties.
- Create a "color" property.
- Paste the hexadecimal code you copied in the value section using "Ctrl-V."
You should now see your page title change to the color you choose.
Classes
You can also apply styles to any elements on a page using classes. A class is a style that can be applied to as many elements on a page as you want. You could create a class that makes text bold and red and use it to highlight important information on your page.
The class attribute specifies one or more class names for an element.
Use the following steps to create a class:
- Go to the CSS Designer tab.
- Hit the "+" next to Selectors.
- Type a period, followed by the name of the class you want to make.
- Add properties to your class, such as the font color.
- Highlight or select the element you want to apply your class to.
- Right-click on the element and choose the class you created.
Classes and styles will be very important in this course, and will be even more important if you move on to Web Design II. It is important to remember that class names always start with a period.


