
Computer Programming I :: Lessons :: Keyboard Movement
Checking For Keyboard Input
In order to make Pong we need to learn how to use input from the keyboard to affect our program. Visual Studio makes this easy to do. First, we need to create the ball and paddles for our game.
- Create a new project called "Pong".
- Create three picture boxes for the ball and paddles.
- Call the picture boxes "picBall", "picLeftPaddle", and "picRightPaddle".
- Add a background color to the PictureBoxes so you can see them against the form and resize the form so it is wider than it is tall.
We don't want the game to start automatically so we will create a KeyDown Event Handler that will start the game when the spacebar is pressed. A KeyDown Event Handler runs whenever a key on the keyboard is pressed. We can use if statements to tell our program what to do when certain keys are pressed.
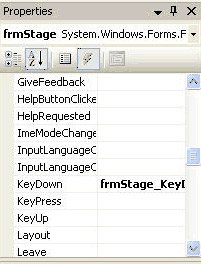
- Make sure the Form is selected and go to the Properties Pane.
- Click on the Event Handler button (the lightning bolt).
- Find the KeyDown Event.
- Double-click the KeyDown Event to add a KeyDown Event Handler to your code.
Using KeyCodes
Now that we have a KeyDown Event Handler we can use it to check for keyboard input.
- Add the following code to the KeyDown Event Handler:
Keys keyCode = e.KeyCode;
if (keyCode == Keys.Space)
{

}
Each key pressed on the keyboard sends a different KeyCode to the computer. KeyCodes are numbers that represent possible keyboard input, similar to ASCII code. We don't have to know the number, however, since using Keys.Space gives us the number for the spacebar, which is the key we are going to use to start the game. You can use the Keys class for getting almost any KeyCode. If you want to test your KeyDown Event Handler put a MessageBox in the if statement.
Timers and Movement
A timer is a form component that runs a block of code based on a specified interval. You must make sure the timer is enabled first, though, because it is not enabled by default.
- Add a timer to your form and call it "tmrBallMove".
- Change the Interval Property of the timer to "1".
To get the ball moving we need to learn a little more about the coordinate system in Visual Studio. Below is a picture of the coordinate plane you know from Geometry.
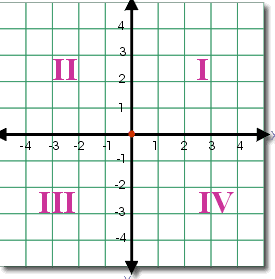
The coordinate plane system has an x-axis and a y-axis. A point is stored as an (x, y) ordered pair. As you go up or down the y-coordinate is changing. As you go left or right the x-coordinate is changing. Below is a view of a grid on the Visual Studio Form and two example points.
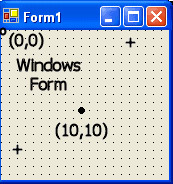
The Visual Studio Form is most similar to Region IV of the coordinate plane, but it is not exactly the same. There are no negative numbers unless you go off the form to the left or top. The origin, or point (0, 0), is located in the upper-left of the form. As you go to the right on the form, the x-coordinate gets bigger and as you go down the form the y-coordinate gets bigger. The y-coordinate may be the biggest adjustment you have to make, but it is common for many animation programs including Adobe Flash. Move one of your PictureBoxes around the form to see how its Location Property changes to get a good handle on how the coordinate system works. Now let's use the timer's Tick Event Handler to move the ball.
- Add a variable "x" at the top of your code and set it equal to 2.
- Double-click on tmrBallMove.
- Add the following line of code to the Tick Event Handler:
picBall.Left = picBall.Left + x;
The ball won't move yet because the timer is disabled. We want to enable the timer when the spacebar is pressed so we will need to add some code to the KeyDown Event Handler:
- Add the following code in red to your KeyDown Event Handler:
Keys keyCode = e.KeyCode;

if (keyCode == Keys.Space && tmrBallMove.Enabled == false)
{
	   tmrBallMove.Enabled = true;
}
The ball should now move to the right once the spacebar is pressed. Now, we need to make sure it will bounce off the paddle.
Collision Detection
There are countless ways to implement collision detection in a game. For our purposes we will check the sides of the ball to see if they would be overlapping the sides of the paddles.
- Create the method below:
public bool collisionPaddle()
{

}
We will call the collisionPaddle method whenever the ball moves. If the ball is colliding with a paddle we need to reverse its direction.
- Add the following code in red to the tmrBallMove Tick Event Handler:
if (collisionPaddle() == true)
  x = x * -1;

picBall.Left = picBall.Left + x;
If the collisionPaddle method returns a value of true the x variable is multiplied by -1. This, in essence, reverses the direction of the ball since instead of adding a negative number to the left side of the ball is the same as subtracting. Now, let's write collision detection to make the ball bounce of the left paddle.
- Add the following code to the collisionPaddle method:
if (picBall.Right >= picRightPaddle.Left)
{
   if (picBall.Top <= picRightPaddle.Bottom && picBall.Bottom >= picRightPaddle.Top)
      return true;
}

return false;
The above code checks to see if the right side of the ball is greater than or equal to the left side of the paddle. If it is, we then check to see if the ball is within the boundaries of the top and bottom of the paddle. If the top of the ball is less than the bottom of the paddle and the bottom is greater than the top of the paddle the ball must be hitting the paddle. Both of the balls below would cause the collosionPaddle method to return true.

Finally, we will write the collisionWalls method to test for collision with the walls. You will need this to prevent the paddles and ball from going past the top and bottom of the form.
- Add two picture boxes to the top and bottom of your form to represent the walls.
- Call the top picture box "picTop" and the bottom one "picBottom".
- Create the collisionWalls method as shown below:
public bool collisionWalls(PictureBox picCollide)
{
  if (picCollide.Top <= picTop.Bottom)
    return true;
  else if (picCollide.Bottom >= picBottom.Top)
    return true;

  return false;
}
The method takes one parameter called picCollide as a picture box. It checks to see if the picture box has passed either the top or bottom walls. If it has it returns true, otherwise it returns false. Since we are taking picCollide as a parameter you can use the collisionWalls method for both the ball and paddles.
Two-Player Movement
We will need to do something special to allow two players to play at once. What we will do is create an array for each player. Each array will hold true in index 0 if the player is moving up and true in index 1 if the player is moving down. We will use a KeyUp Event Handler to determine if the player has let go of the key.
- Add the following variables to the top of your code:
const int speed = 8;
bool[] player1 = new bool[2];
bool[] player2 = new bool[2];
The speed variable is a constant. A constant variable cannot be changed by the code. Since the speed of the paddles will never change it is best to declare it as a constant. The two arrays will hold booleans in index 0 and index 1.
- Add the following code in red to the KeyDown Event Handler:
Keys keyCode = e.KeyCode;

if (keyCode == Keys.Space && tmrBallMove.Enabled == false)
{
   tmrBallMove.Enabled = true;
}
else if (keyCode == Keys.A)
  player1[0] = true;
else if (keyCode == Keys.Z)
   player1[1] = true;
else if (keyCode == Keys.Up)
   player2[0] = true;
else if (keyCode == Keys.Down)
   player2[1] = true;
Now that we have changed the array to true when the players press a key, we need to change it to false when they let go of the key using a KeyUp Event Handler.
- Add a KeyUp Event Handler
- Add the following code to the KeyUp Event Handler:
Keys keyCode = e.KeyCode;

if (keyCode == Keys.A)
   player1[0] = false;
else if (keyCode == Keys.Z)
   player1[1] = false;
else if (keyCode == Keys.Up)
   player2[0] = false;
else if (keyCode == Keys.Down)
   player2[1] = false;
Now we have the ability to move the paddle. We just need to create a timer to move them.
- Create a new timer and call it "tmrPaddleMove".
- Enable the timer and change its interval to 1.
- Add the following code to tmrPaddleMove:
if (player1[0])
  picLeftPaddle.Top -= speed;

if (player1[1])
  picLeftPaddle.Top += speed;

if (player2[0])
  picRightPaddle.Top -= speed;

if (player2[1])
  picRightPaddle.Top += speed;
The paddles should now move up and down. The rest of the project will be up to you to complete.
On Your Own
There are a few things you will need to do to finish this project.
- Make the ball bounce off the left paddle by adding to the if statements in the collisionPaddle method.
- Get the ball to move up and down as well as left and right.
- Get the ball to bounce off the top and bottom walls. The paddles should also stop when they hit the top and bottom walls.
- Make the ball move in a random x, y direction when the game starts.
- Create a method called goal that checks to see if the ball has passed a paddle. If it has the score is changed and the ball is reset to the middle of the form.
- Allow the user to quit the game by pressing a button before it starts. The game should state the winner before it quits.


