
Computer Applications I :: Lessons :: Assumption Tables
Percent Style
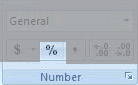
Like Currency Style, Percent Style formats numbers in a certain way. In this case, it changes a selected number to its percent of the number 1. So if you had the number 40 selected and changed it to Percent Style it would change the number to 4000%. However, unlike Currency Style, where you can't type the dollar sign manually without causing potential problems, you can type your number followed by a percent and it will automatically be converted to Percent Style. Alternatively, you can go to Home>Number>Percent Style to make a cell Percent Style in Excel or click on the % button in Google Sheets.
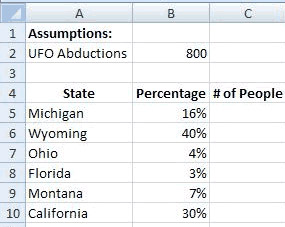
- Create your spreadsheet like the one below:
The Fill Handle
The upper table of the spreadsheet above is known as an Assumption Table. An assumption table is simply a place where data that will be used frequently within the spreadsheet is placed. Generally, you want to put it above your main table and label it "Assumptions." We are going to be using the number of UFO abductions, 800, in all 6 of our formulas so it is important to put it in an assumption table.
- Click in Cell C5.
- Type "=B2*B5" and press "Enter".
You should get 128 as your result after pressing "Enter." Make sure you used cell references and you didn't simply type in the values of 16% and 800. Also, remember that you can click in the cells when typing a formula, but you can only do this after you have typed the =.
The other five formulas are almost exactly the same as our first formula. They all use Cell B2, but they each use a different percentage. A tool known as the Fill Handle will allow us to copy our original formula. The Fill Handle is always available in the active cell. If you look in the lower-right corner of the active cell you will see a small box that can be pulled. In Excel, the box is black, in Google Sheets it is blue. You can pull the Fill Handle in any direction to copy the formula from the active cell. The cell locations will update based on the direction you pull. For example, if you pull a formula down, the cell locations will move down so B5 would change to B6. If you pulled a formula right the cell locations would move right so B5 would change to C5.
- Click in Cell C5.
- Drag the Fill Handle down to Cell C10.
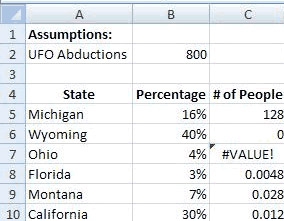
You may notice the results come out differently than you might expect, and Excel and Google Sheets generate an error in Cell C7. We will figure out the problem next.
Locking Cell References
If you take a look at the new formulas that the Fill Handle created you may notice something strange. Cell C6 says "=B3*B6." The B6 part is right since it is using 40%, but B3 is not 800, it is the blank cell below 800. The program treats an empty cell as a zero so the actual formula is 0*40% which equals 0. Looking at the formula in Cell C7 we see "=B4*B7." Again, B7 is correct, but B4 is the word "Percentage." The program generated an error because we tried to multiple a number with text.
Hopefully you realize what the problem is. When we copied the formula down using the Fill Handle both cell references in our formula moved down, but we want the reference to Cell B2 to stay in place. This is a common task so it is made fairly easy to do in spreadsheet programs. The process is known as locking cell references.
- Click in Cell C5.
- Change the formula to "=$B$2*B5".
- Use the Fill Handle to drag the formula to Cell C10, overriding the old formulas.
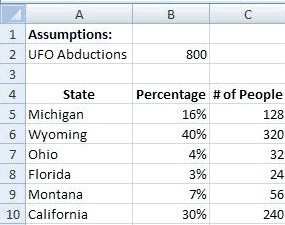
You should now have the results seen above. Notice that you didn't have to delete the old formulas before you used the Fill Handle again. The Fill Handle simply replaced the old formulas with the new formulas. To lock a cell reference you need to put a dollar sign before AND after the letter of the cell reference. This is why you can't type dollar signs in a formula without causing potential problems. If you look at all of the formulas you should now see that they all contain Cell B2.
Why Use Assumption Tables?
Assumption tables allows users to easily change data used by our formulas. While it wouldn't have been a challenge to change the number 800 if we had used it in all the formulas because of the usefulness of the Fill Handle, it would have been a bigger deal if we used that number in a lot of different places throughout our spreadsheet. Changing that number everywhere it is used would have been slow and not much fun. It is important to use assumption tables whenever you can, and to always use cell references and lock the references, if necessary.
Counting With The Fill Handle
A lesser-known feature of the Fill Handle is its ability to count. You can type two numbers next to each other or on top of each other, highlight both cells, and then use the Fill Handle. Doing so will display a number as you drag and when you let go of the Fill Handle all the cells in between will be filled with numbers. You can type a 1 and a 2 next to each other and use the Fill Handle to count by 1s, or you could type a 5 and a 10 on top of each other to count by 5s. You can even put text in front of the number so typing "Final Fantasy 1" followed by "Final Fantasy 2" will have the same effect. This is another time-saver, and will be useful for many of your later projects.
Pie Charts
Everyone likes pie charts! Pie charts are also simple to create in spreadsheets programs. Our first pie chart will display the percentages of abductions from each state.
- Select Cells A3 through B9.
- Choose one of the single pie chart options.
You can edit the chart to change the look of it or edit the title and labels.


