
Database Programming :: Lessons :: HTML
Uploading Websites
HTML, or HyperText Markup Language, uses tags to format static content such as images and text. Dynamic content, alternatively, is content that the user can interact with such as scripting languages.
HTML files must end with an extension of .html and are text-based ASCII files. The name of the main HTML file in a directory should be index.html.
To create a website you must create the pages on your computer in a .html file. You can either use a text-editor such as Notepad++ or a more sophisticated website creation program like Dreamweaver, which is available on our school computers.
To upload a website you will need to use an FTP program such as FileZilla. The directions below are how to upload your website files through Dreamweaver, but they can be modified to apply to any FTP program.
FTP stands for File Transfer Protocol and is the system you will use to upload images and files to your website. FTP is simply a network protocol that allows two computers to exchange data. In this case, our two computers are the computer that hosts your files (the school's network drive server) and the computer that hosts your website (the server that hosts the YHSCS website). The steps below will help you set up the remote setting for your website so you can upload it to the internet.
- Go to Sites>Manage Sites.
- Click on the "New Site" button.
- Choose a "Site Name" for your site that reflects the purpose of the website.
- Click on the folder icon next to Local Site Folder and select your website's root folder.
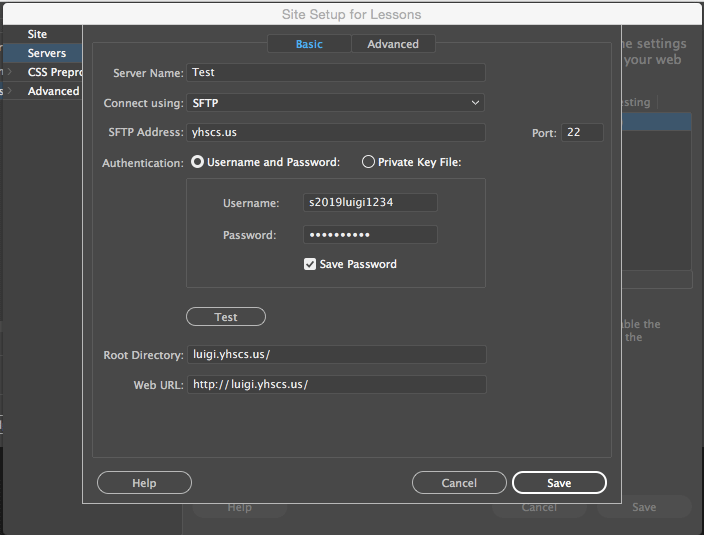
- Go to the "Servers" category.
- Click on the + button to add a new server.
- Give the server a name so you know what project it is.
- Connect using "SFTP."
- The SFTP Address should be yhscs.us.
- The Root Directory should be your first name, followed by yhscs.us. For example, luigi.yhscs.us would be the root directory for a student named Luigi. If there are other students in the class with your same first name, you may have to put the first initial of your last name as well.
- Your Username for the FTP server should be a lowercase 's', your graduation year, full first name, and the last four digits of your ID number. For example, s2019luigi1234.
- Your Password for the FTP server should be "yhs" followed by your full ID number.
- Hit the test button to ensure your settings are correct. You should see a message like the one to the right if you connected successfully.
Once you have set up a connection to your FTP site you can upload or download your files. Uploading (or putting) your files means putting the files on your web server. Downloading (or getting) files means getting files off your website. If the files you are getting or putting already exist then the old files will be replaced. If you attempt to replace a newer file with an older one Dreamweaver will warn you first. The Files Panel is the area where you will do this.
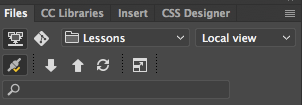
- Change "Local view" to "Remote view" and wait for Dreamweaver to connect to your website.
- Create a folder on the remote site for your website. If this website is a project, the name of the folder will be given to you in the project instructions.
- Go back to the "Remote Info" category in your site settings and add the name of the folder you just created to the end of the host directory.
- Hit the test button to ensure you correctly created a remote folder.
- Change back to "Local view."
You can use the Put File(s) button (up arrow) to put individual files on your website. You can access the website by typing the entire host directory in a web browser. For example, you could type luigi.yhscs.us/pasta/ to access Luigi's pasta website, which he created by creating a "pasta" folder and uploading it to his directory.
An HTML Template
A web page needs to start somewhere. The following code is modified from SitePoint's template and contains everything you need to start a page in HTML.
<!doctype html>
<html lang="en">
<head>
	<meta charset="utf-8">
	<title>CHANGE THIS</title>
	<meta name="description" content="CHANGE THIS">
 	<meta name="author" content="CHANGE THIS">

	<!--[if lt IE 9]>
	<script src="https://cdnjs.cloudflare.com/ajax/libs/html5shiv/3.7.3/html5shiv.js"></script>
	<![endif]-->
</head>

<body>
  YOUR CONTENT GOES HERE
</body>
</html>
The doctype, or Document Type Declaration, tells the browser that your web page is using HTML5. You can check out W3Schools for more details about doctypes, but you only need to know what the HTML5 doctype looks like.
The <html> tag begins and ends your HTML document. The lang attribute specifies that the page is in English, but your page would still work correctly without it. Most tags have a beginning and an ending tag, and everything between the beginning and ending tags is considered to be a child of the tag. Therefore, everything except the doctype is a child of the <html> tag.
The <head> tag contains information about the page, most of which is not seen by the visitor to the page. The <meta> tag can be used multiple times with different attributes that specify information about the page. The <meta> tags used in the above template specify the character set (UTF-8) used by the document, a description of the page, and the author of the page. You can check out W3Schools for more details about the <meta> tag. The <title> tag is used to specify the title of the page and will appear in the tab of the web browser.
The next section of the template is not something you need to worry too much about, but it does provide HTML5 support for older versions of Internet Explorer using a Javascript developed by John Resig. You can read the description of the template on SitePoint for more information on the backwards compatibility for Internet Explorer.
Finally, the <body> tag is the tag you will be using the most as all of your content will go in the body tag. All of the tags discussed below should be children of the <body> tag.
Important HTML Tags
The <p> tag, or paragraph tag, is a tag you will use a lot for text. The paragraph tag contains text that you want to display and there will be an extra blank line between two paragraphs of text. If you don't want to create a blank line you can use the <br> tag, or line break tag, as a child of a paragraph tag. The line break tag is what is known as an empty tag, which means it does not have an ending tag. The example below shows how you can use the paragraph and line break tags in tandem. The result is shown after the code.
<p>This is the first paragraph.</p>
<p>This is the second paragraph <br>with a line break.</p>
This is the first paragraph.
This is the second paragraph
with a line break.
The <img> tag, or image tag, is used for embedding images on your page. The image tag is an empty tag so it does not have an end tag. The image you want to use should be in the same directory as your HTML page or else you need to specify the path to the image file. The following code is how you can embed an image assuming it is in the same directory as your HTML file:
<img src="myImage.png" alt="Image Description">
The src attribute of the image tag specifies the location of the image while the alt attribute is a description of the image used by search engines and other content scrappers.
Header tags are used to showcase important text on the page. The possible header tags from most important to least important are <h1>, <h2>, <h3>, <h4>, <h5>, <h6>. The <h1> tag should be used exactly once on a page. The other tags can be used as many times as you want.
Links to other pages, documents, or files can be created using the anchor tag (<a>). You can either use relative links (the file you are linking to is somewhere within the directory of the current HTML file) or absolute links (the full path to the file). An example of a relative link would be "images/myImage.png" and an example of an absolute link would be "https://yhscs.us/images/myImage.png". You create a link to a file using the href attribute of the anchor tag like so:
<a href="https://yhscs.us">Learn Stuff Here</a>
There are three types of lists you can create in HTML, but we will only cover two. An unordered list, also known as a bulleted list, can be created using the <ul> tag. An ordered list can be specified using the <ol> tag. Individual list items are specified using the <li> tag as a child of the list tag. The example below shows both list types.
<ol>
    <li>Learn HTML</li>
    <li>...</li>
    <li>Profit!</li>
</ol>

<ul>
    <li>Team Instinct</li>
    <li>Team Mystic</li>
    <li>Team Valor</li>
</ul>
- Learn HTML
- ...
- Profit!
- Team Instinct
- Team Mystic
- Team Valor
The <hr> tag, or horizontal rule, is an empty tag used to create a horizontal line like the one below.
Tables in HTML can be complicated. W3Schools has a great table tutorial, but you just need to know that tables are made up of <table>, <tr>, <td>, and <th> tags. The three tags after the <table> tag stand for "table row," "table data," and "table heading." Since creating tables can get tedious you can use the Tables Generator website to generate the HTML for you. Otherwise, the following HTML would create a table:
<table>
    <tr>
    	<th>Starter Name</th>
        <th>Type</th>
    </tr>
    <tr>
    	<th>Bulbasaur</th>
        <th>Grass / Poison</th>
    </tr>
    <tr>
    	<th>Charmander</th>
        <th>Fire</th>
    </tr>
    <tr>
    	<th>Pikachu</th>
        <th>Electric</th>
    </tr>
    <tr>
    	<th>Squirtle</th>
        <th>Water</th>
    </tr>
</table>
| Starter Name | Type |
|---|---|
| Bulbasaur | Grass / Poison |
| Charmander | Fire |
| Pikachu | Electric |
| Squirtle | Water |
Styling HTML
Classes can be applied to any HTML tag on your page and can be used multiple times. IDs can be applied to any HTML tag, but they can only be used once. Classes are applied by using the "class" attribute within an HTML tag while IDs are applied using the "id" attribute.
HTML tags are meant to display the content of a web page, but CSS, or cascading style sheets, is meant to change the presentation of that content. There are three ways to apply CSS styles to your page, but we will only focus on embedded styles which apply to a single page.
You can create embedded styles within the <head> tag of your HTML page. This is just a quick preview of CSS. If you want to go more in-depth check out W3Schools' CSS Tutorial. Styles are organized by first specifying the selector. A selector can be an HTML tag, a class (specified by .className), an ID (specified by #idName), or a combination of all three. After the selector are one or more declarations that each have a property that will be changed by this style and a value that the property of the selector will be changed to. The following example will change all paragraphs on the page to centered, red text and add a border to the class specified.
<style>
    p {
        color: red;
        text-align: center;
    }

    .importantInfo {
        border: solid blue 2px;
    }
</style>
With the implementation of CSS3 there is a good option for using fonts on the web. The @font-face rule allows you to embed fonts on your website so even users without the font installed on their computer can see what you intended.
To create a @font-face rule you would add the following to your CSS file:
@font-face {
   font-family: 'AG';
   src: url('../fonts/aubrey_graham-webfont.eot');
}
Make sure you have permission to use the font in this way. Many free fonts can be found at sites such as Font Squirrel and Da Font.
To use the font above you would use the font-family name that you specified in a font-family hierarchy like so:
.myFont {
   font-family: 'AG', Impact, sans-serif;
}
The @font-face rule does not work in many older browsers, but as long as you use the font-face in a font-family hierarchy you should be safe. It is also important to note that not all browsers support the same font types. Internet Explorer is the worst offender, but you can get around it by using a tool such as Transfonter to create different versions of your font.


